BridgeJCH : Ce programme utilise le serveur Linux et Wifi 'Linino' de la carte YUN Arduino utilisée en serveur HTTP.
Il
est la partie 'client' et donc doit être
couplé avec le logiciel Yun (nommé à l'origine 'Bridge.ino') modifié 'BridgeJCH' que l'on retrouve sur les
exemples fournis avec la version 1.5.5 de l'IDE Arduino.cc
Par ailleurs une page HTML 'console Yun Server' est créée. Via le navigateur, elle permet de commander une LED (led13) soudée sur la carte Arduino, de générer une tension sur la patte 9 ou de configurer une patte en sortie.
Une
page résidant dans le YUN
Arduino simulant une
remontée de température est accessible.
Intérêt du concept:
> pouvoir assez simplement remonter des valeurs capteurs au Web (Domotique),
> piloter un robot en Wifi (déport de 'lintelligence sur un PC/ou Tablette),
> rajouter des commandes à 'digital/mode ou analog' dans le source *.ino pour les lancer ensuite par un navigateur et les exécuter dans le Yun.
(1) Limitations:
Pour l'instant, il est nécessaire d'être à proximité de la box, dans le réseau local (le Yun doit être ds le même réseau que le PC ou la tablette) (paramétrages de ports de la Freebox à terminer).
Le téléversement est très pratique (pas de fil à la patte!) mais est plus lent qu'avec l'usb disponible sur le Yun.
Option: Un test de téléchargement d'un fichier distant (ici un logo ARDUINO) est appelé par une commande CURL, une écriture/lecture sur carte SD est possible suivant une option de compilation.
Si, sous le contrôle de Chrome ou Firefox par ex, on saisit l'adresse IP de la carte Arduino dans ce navigateur, alors le navigateur va envoyer une requête par un GET au serveur en lui donnant au passage une série d'informations sous forme de 'chaine de caractères'.
Les commandes passées sont du type: LED 13 allumée ou éteinte avec action="http://192.168.0.18/arduino/digital/13/0" ou 1
1)> LIRE D13
2)> ETEINDRE D13
2)> ALLUMER D13
6)> CONFIGURER en SORTIE D9
3)> GENERER du pwm
4,2V sur D9
3)> GENERER du pwm
1,1 V sur D9
Les retours d'échanges "client/serveur" sont affichés dans une 2nde fenêtre HTML souvrant sur le navigateur du PC ce qui permet de bien comprendre ce qui se passe.
Ce programme montre également comment extraire de l'information reçue depuis le client.
BridgeJCHo.ino (ssi compilé avec l'option #define modeDbg true) met en oeuvre:
> Une commande "cURL" pour obtenir/télécharger ds la console un logo Arduino.txt en "ascii art" depuis le Net (cURL est une interface en ligne de commandes pour transférer des données en utilisant différents protocoles Internet)
>
Envoi une commande SHELL écrite en LUA (livré avec le YUN)
pour
afficher l'état du réseau "pretty-wifi-info.lua" ds la console.
L'environnement arduino (donc ici le BridgeJCH.ino) n'a pas besoin de générer l'entête HTTP mais uniquement la 'partie utile' à Linino. Ce sera ensuite Linino qui 'formatera' le retour vers le navigateur client ayant fait la demande.
Pour accéder à la carte SD, il suffit (de lancer le serveur Web Linino puis) de se connecter à l'adresse http://<ip>/sd/.
En fait Linino mettra à disposition le répertoire /arduino/www sur la carte SD et donc tous les fichiers présents ds ce répertoire seront visibles.
GENIAL, le YUN à 60 euros pourra parler au monde entier!
Ce programme utilise la classe String qui permet la manipulation aisée des chaines de caractère pour trouver et extraire les séquences voulues.
On utilise ici la librairie flash qui permet de stocker des chaînes de caractères en mémoire Flash programme (client.print(F)) plutôt qu'en RAM : notre programme utilise beaucoup de chaînes de caractères
Le langage Arduino apparaît ici une nouvelle fois dans toute sa puissance: Les possibilités ouvertes par ce programme sont assez impressionnantes puisque l'on peut ainsi envisager:
--> la commande à distance de dispositifs par internet
--> ou sur le réseau local... Que du bon !!
Pour plus de détails sur le protocole HTTP, voir : http://fr.wikipedia.org/wiki/Hypertext_Transfer_Protocol
Cette page suppose également une connaissance de base en langage HTML : on trouvera tout ce qu'il faut pour s'y mettre sur internet, notamment :
On suppose également une connaissance minimale en structure de réseau éthernet.
NOTIONS YUN Arduino (source site Officiel Arduino)
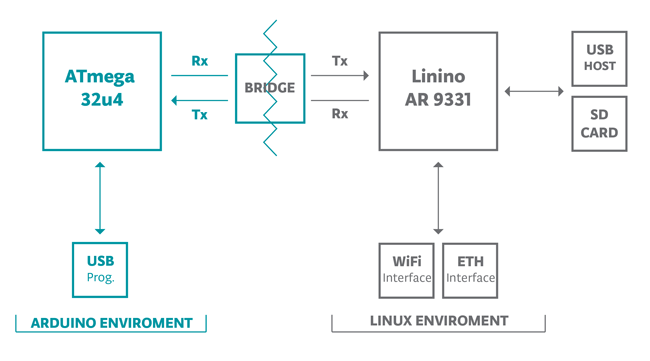
The Bridge library enables communication between Arduino and Linino. There are several different utility classes that facilitate different kinds of communication between the two, described below, and more in depth on the Bridge library reference pages.
The WiFi and Ethernet interfaces, USB host, and SD card are all connected to the AR9331. The Bridge library allows you to work with these devices, as well as run scripts and communicate with web services.
Linino uses REST for clients and servers. REST is an acronym for "Representational State Transfer". It is a software architecture that exposes various parts of the Arduino hardware through URLs.
By default, the REST API access is password protected. It is possible to change this to access the services without a password. To change this setting, enter the Yún configuration panel. At the bottom of the page, you will see toggles for changing the access.

A nice introduction to the concepts behind REST can be found here.
The there are two REST end points recognized by the Yún are:
The "/arduino" directory doesn't have anything pre-configured. Anything added to the URL after the end point is passed from the webserver to the sketch on the 32U4. You can define your APIs inside the sketch. See the Bridge example to see how this is done to access the pins on the board.
"/data" is used to access to the internal key/value storage. The available calls are:
Bridge allows you to pass information between the two processors using a key/value pairing.
This example shows how to use the Bridge library to access the digital and analog pins on the board through REST calls. It demonstrates how you can create your own API when using REST style calls through the browser.
When running this example, make sure your computer is on the same network as the Yun.
When you have have programmed the board, you can request the value on a pin, write a value to a pin, and configure a pin as an input or output.
When the REST password is turned off, you can use a browser with the following URL structure :
You can use the curl command from the command line instead of a browser if you prefer.
You need to include the Bridge, YunServer, and YunClient libraries :
Instantiate a server enabling the the Yun to listen for connected clients.
YunServer server;
In setup(), start serial communication for debugging
purposes, and turn the built-in LED on pin 13 high while Bridge begins.
Bridge.begin() is blocking, and should take about 2
seconds to complete. Once Bridge starts up, turn the LED off.
In the second part of setup(), tell the instance of YunServer
to listen for incoming connections only coming from localhost.
Connections made to Linino will be passed to the 32U4 processor for
parsing and controlling the pins. This happens on port 5555. Start the
server with server.begin().
In loop(), you'll create an instance of the YunClient
for managing the connection. If the client connects, process the
requests in a custom function (described below) and close the
connection when finished.
Putting a delay at the end of loop() will be helpful
in keeping the processor from doing too much work.
Create a function named process that accepts the YunClient
as its argument. Read the command by creating a string to hold the
incoming information. Parse the REST commands by their functionality
(digital, analog, and mode) and pass the information to the
appropriately named function.
Create a function to deal with digital commands. Accept the client as the argument. Create some local variables to hold the pin and value of the command.
Parse the client's request for the pin to work with using client.parseInt().
If the character after the pin is a "/", it means the URL is going to have a value of 1 or 0 following. This value will assign a value to the pin, turning it HIGH or LOW. If there is no trailing "/", read the value from the specified pin.
Print the value to the client and update the datastore key with the current pin value.
By wrapping the value to the client in F(),
you'll be printing form the flash memory. This helps conserve space in
SRAM, which is useful when dealing with long strings like URLs.
The key will be the pin, and type. For example D2 will be saved for for digital pin 2. The value will be whatever value the pin is currently set to, or was read from the pin.
Set up a function to handle analog calls in the same fashion, except setting the key to A instead of D when working with the analog input pins :
Create one more function to handle pin mode changes. Accept the YunClient as the argument, and create a local variable to hold the pin number. Read the pin value just as you did in the digital and analog functions.
Check to make sure the URL is valid
If it's a valid URL, store the URL as a string. If the mode is an input
or output, configure the pin and report it to client. If
the string doesn't match those values, return an error.
You can find more details on this example on the Bridge Example page.